Physical Address
304 North Cardinal St.
Dorchester Center, MA 02124
Physical Address
304 North Cardinal St.
Dorchester Center, MA 02124

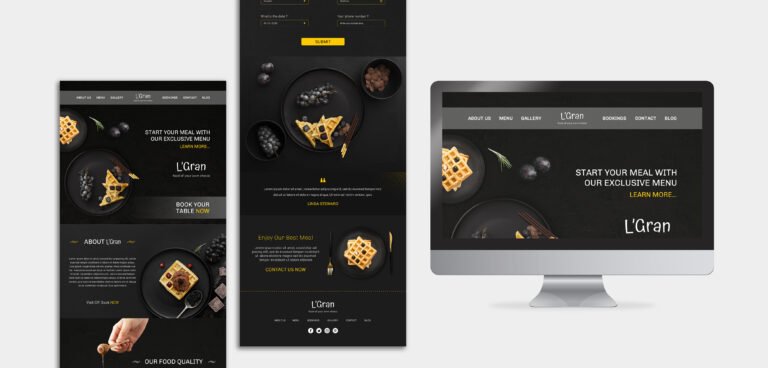
How to use Elementor to build stunning, professional websites has become one of the most common questions among WordPress users and for good reason. Elementor is a powerful drag-and-drop page builder that gives you total design freedom without needing to write a single line of code. In this guide, we’ll walk you through everything you need to know, from getting started to mastering advanced features, so you can build faster, smarter, and more effectively.
Elementor is one of the most powerful tools for building websites on WordPress no coding required. But before you can unlock its full potential, you’ll need to set it up properly. Whether you’re building a personal blog, a business site, or an eCommerce store, this section will walk you through exactly what you need to do to get Elementor up and running the right way.
To get started, log in to your WordPress dashboard:
That’s it you now have the free version of Elementor. If you’ve purchased Elementor Pro, you’ll also need to install the Pro plugin:
.zip file, install, and activate.💡 Pro Tip: The free version is great for simple pages, but Elementor Pro unlocks advanced design capabilities like the Theme Builder, dynamic content, and popup builder.
Elementor works with most WordPress themes, but some are better optimized than others. If you want maximum design flexibility and speed, consider one of these:
Avoid themes that come with built-in page builders or heavy customization options they can conflict with Elementor or slow down your site.
Once Elementor is installed, go to:
Then, when you create a new page, click Edit with Elementor. Before you start designing, set the page layout to Elementor Canvas (full-width, no header/footer) or Elementor Full Width (includes theme header/footer) based on your design needs.
New users often make the mistake of installing too many Elementor add-ons or using dozens of widgets on a single page. Instead:
This will help keep your site clean, fast, and easy to maintain in the long run.
Elementor has a strong community and plenty of learning resources. If you ever feel stuck:
Getting started with Elementor doesn’t have to be overwhelming. With the right setup, a lightweight theme, and a clear plan, you’ll be designing beautiful, responsive pages in no time without writing a single line of code.
Once you’ve installed Elementor and launched your first page, you’ll be greeted with a visual editor that’s intuitive but packed with power. Knowing your way around the interface will save you time, reduce frustration, and help you build better pages faster.
Let’s break down the key areas of the Elementor interface and how to use them effectively.
This is the heart of the Elementor editor. Everything you build sections, columns, widgets will appear here in real time. You can click on any element directly to edit it, which makes the design process visual and instant.
Pro Tip: Treat this area like a live wireframe. Structure your layout first (Sections → Columns → Widgets), then focus on the styling.
This is where you’ll drag-and-drop elements onto the canvas. Elementor divides widgets into basic (available in the free version) and advanced (unlocked with Pro).
Key widget categories:
Each widget opens a unique set of options in three tabs:
Located at the top of the interface, this toolbar gives you access to important functions:
Bonus Tip: Use the Navigator when working with nested sections or overlapping elements it’s a lifesaver.
Click the gear icon in the bottom-left to control page-specific settings like:
These settings are useful for controlling the design canvas without diving into code or modifying the theme files.
At the bottom of the sidebar, you’ll see options to:
If you want to reuse a design later, you can also Save as Template, allowing you to import it to any page in the future.
Elementor’s interface makes mobile editing simple. By clicking the responsive icon, you can switch views and tweak designs for:
You can even hide/show elements by device, fine-tune typography, or adjust spacing per screen size all without plugins.
The Elementor interface is built for clarity, but there’s real depth beneath the surface. Mastering the basics canvas, widgets, toolbar, responsive tools sets you up for success. The more you explore, the more you’ll discover ways to work faster and build more polished websites.
Take time to experiment. Familiarity with the interface isn’t just about knowing where things are it’s about using them confidently and creatively.
You’ve installed Elementor and learned your way around the interface now it’s time to put it all into action. In this section, you’ll create your very first page with Elementor, step by step. Don’t worry if you’re not a designer Elementor does most of the heavy lifting for you.
Start by navigating to your WordPress dashboard:
This launches the Elementor editor and takes you straight to the visual builder.
Before you start designing, set your page layout for maximum control:
Choosing the right layout upfront avoids unexpected design constraints later.
If you’re new to design, Elementor’s templates are a great place to start:
💡 Pro Tip: Use templates for inspiration and then customize them to reflect your brand. Don’t rely on them blindly edit text, colors, and images to make it unique.
If you want to build from scratch, start with a Section:
Then drag Widgets (like Headings, Text, Images, Buttons) from the left panel into your columns.
Keep your layout clean:
Click any widget to bring up its settings. Use the three tabs:
Don’t try to perfect everything right away. Focus on laying things out first, then polish.
Elementor automatically saves your work as you go, but you can:
This is a big time-saver especially if you plan to use a consistent layout across multiple pages.
Once you hit Publish, click View Page to see your creation in action. If anything looks off, go back into the editor and tweak.
Test your page on desktop, tablet, and mobile using the Responsive Mode tool to make sure everything looks clean across devices.
Creating your first page with Elementor isn’t just about dragging and dropping it’s about thinking in terms of structure, clarity, and usability. The tools are powerful, but the real magic happens when you combine them with a purpose-driven layout and content that resonates with your audience.
Start simple. Refine as you go. And don’t be afraid to experiment that’s how the best designs are born.
At the core of Elementor’s power is its widgets modular building blocks that allow you to add and style everything from simple text to advanced features like sliders, forms, and pricing tables. Knowing how to use these effectively can transform a basic page into a fully functional, visually engaging website.

Let’s break down the most useful design elements and how to get the most out of them without bloating your site or overwhelming your visitors.
Widgets are the draggable elements you use to build content in Elementor. Think of them like Lego blocks you stack and style them to create a custom layout.
Each widget can be customized using three tabs:
These core widgets are available in Elementor’s free version and are enough to build most standard pages:
💡 Pro Tip: Stick to just a few widgets per section. Clean, focused layouts convert better than cluttered ones.
Elementor Pro unlocks powerful widgets that add serious functionality:
These are ideal when you want to go beyond static content and add real interactivity or automation to your site.
Global Widgets let you create a widget once and reuse it across multiple pages. If you update the original, every instance updates automatically.
Use this for:
This keeps your site consistent and makes updates painless.
It’s easy to get carried away with animations, shadows, and custom fonts. But remember: more styling = more code = slower load times.
Best practices:
Focus on clarity, usability, and performance over visual gimmicks.
Want to add rows within rows? Elementor lets you do this using Inner Sections. While they’re helpful for advanced layouts, using too many can make your page heavy and hard to manage.
Use Inner Sections when:
Avoid when:
Mastering Elementor’s design elements isn’t about using every widget it’s about using the right ones with intention. Start with the basics, stay consistent with your styling, and only bring in advanced elements when your content truly calls for them.
Great design is more about clarity than complexity. If your content is strong and your layout is user-friendly, your site will naturally look and perform better no tricks required.

While the free version of Elementor is packed with value, Elementor Pro takes things to another level especially for users who want full site control, better SEO tools, and scalable design systems. If you’re building more than just a basic landing page, the Pro features can save you time, improve performance, and unlock new possibilities.
Let’s break down the most impactful features and how they can elevate your site (and your workflow).
The Theme Builder is one of Elementor Pro’s biggest game-changers. It allows you to replace your WordPress theme’s templates with your own designs no PHP or child theme required.
You can create custom templates for:
Why it matters: You get full creative control without needing a developer, and you can apply different designs to different parts of your site using conditions (e.g., a unique post layout just for blog posts in the “Tutorials” category).
With the Popup Builder, you can create all types of popups using the same drag-and-drop tools you’re already using in Elementor.
Popup types you can create:
They integrate seamlessly with forms and third-party email tools like Mailchimp, ActiveCampaign, and ConvertKit.
Why it matters: You don’t need a separate popup plugin (less bloat), and you get full control over design and behavior. More control = better conversions.
Elementor Pro allows you to insert dynamic content into your designs like pulling in the post title, featured image, author name, or custom fields from tools like ACF or Pods.
This is ideal for:
Why it matters: Dynamic content lets you design once and reuse everywhere, making your site faster to build and easier to maintain. Plus, it’s perfect for SEO because it gives you structured, templated content with keyword consistency.
The Forms widget is more than a contact form it’s a full lead-generation tool. You can create multi-step forms, add conditional logic, and integrate with almost any CRM or email marketing tool.
It supports:
Why it matters: Forms are one of the most important parts of any business website. With Elementor Pro, you don’t need an external form plugin, which means fewer plugins, fewer updates, and better performance.
If you’re running an online store with WooCommerce, Elementor Pro gives you tools to build custom:
Why it matters: Most WooCommerce themes are limited in design. With Elementor Pro, you can fully control how products look, how they’re presented, and how they convert all without touching code.
Elementor Pro includes a robust Global Settings feature, letting you define:
Plus, you can save and reuse Global Widgets, Templates, and even entire Theme Parts.
Why it matters: A consistent design system means faster edits, easier updates, and a more professional user experience especially if you’re managing client websites or scaling a brand.
Elementor Pro isn’t just “extra stuff” it’s a productivity and performance multiplier. The tools it provides help you:
If you’re serious about growing your site, running a business, or designing for clients, the upgrade pays for itself quickly. But even if you stay on the free version, understanding these features gives you a roadmap for what’s possible when you’re ready to level up.
Elementor makes it easy to build beautiful websites but to build effective websites, it helps to follow some best practices. Whether you’re a beginner or a frequent user, these tips will keep your site running smoothly, looking great, and performing well in the long run.

It’s tempting to dive straight into dragging widgets, but a little planning goes a long way.
Before you open Elementor:
Why it matters: Planning prevents clutter and ensures every section has a purpose.
Elementor gives you endless design freedom but more isn’t always better.
Tips for clean design:
Why it matters: Clean designs load faster, are easier to navigate, and create a better user experience.
Set your default fonts, colors, and button styles in Site Settings (under the Elementor hamburger menu). Apply them across your site.
Why it matters: Global settings make your design consistent and save time you won’t need to re-style every widget manually.
Pro Tip: Limit nesting to one level deep unless you absolutely need more. Cleaner structure = easier edits later.
More than 50% of web traffic is mobile design for it intentionally.
What to check:
Use Elementor’s Responsive Mode tool to preview and tweak as you go not just at the end.
There are hundreds of Elementor add-ons out there. While some are useful, too many can:
Only install what you truly need and try to keep things within Elementor’s native features or Pro version when possible.
Don’t rebuild the same design from scratch on every page.
Use:
Why it matters: Save time, ensure consistency, and simplify future edits.
Design is important but visibility and usability are key too.
Quick wins:
Bonus Tip: Combine Elementor with an SEO plugin like Rank Math or Yoast for max visibility.
Before going live:
Why it matters: Small issues missed in editing can hurt user trust or conversions once your page is live.
Elementor and its add-ons release updates frequently. Keep them updated, but:
Regular updates keep your site secure and running smoothly, but blindly updating can sometimes break designs especially if using older themes or third-party add-ons.
Using Elementor effectively isn’t just about building pages it’s about building better websites. With smart planning, a clean design approach, and attention to performance and usability, you’ll create pages that don’t just look good, but actually work for your audience and your goals.
Stick to these best practices and you’ll build faster, rank better, and reduce future headaches guaranteed.
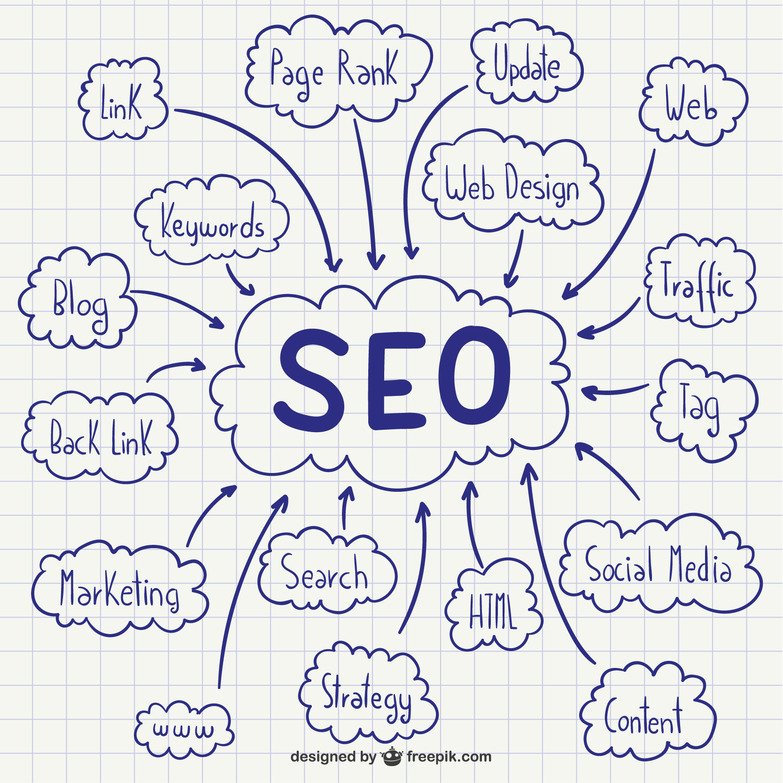
Elementor gives you incredible control over design but when it comes to ranking on Google, design alone isn’t enough. To truly make your site visible, you need to build with SEO in mind from the start.
The good news? Elementor is SEO-friendly out of the box and when paired with the right techniques, it becomes a powerful tool for optimizing every part of your page.
Here’s how to make it work for you:
Google loves organized content. Elementor lets you build with sections, columns, and widgets but that doesn’t mean you can forget about hierarchy.
Best practices:
✅ Why it matters: Structured content improves both SEO and user experience.
Elementor doesn’t handle SEO metadata directly but it integrates perfectly with top SEO plugins like:
With these, you can:
✅ Why it matters: These plugins handle the behind-the-scenes SEO essentials that Elementor doesn’t cover on its own.
Elementor sites often use a lot of imagery great for design, risky for speed. Speed is a ranking factor, so image optimization is key.
Do this:
✅ Why it matters: Proper image handling keeps your site fast and accessible.
Elementor lets you design for desktop, tablet, and mobile separately. Use that power.
Mobile SEO tips:
Also, run your site through Google’s Mobile-Friendly Test to be sure it passes.
✅ Why it matters: Mobile usability is a core part of Google’s ranking algorithm.
Speed is SEO. Elementor gives you visual power but that comes at a cost if not managed right.
Speed optimization checklist:
✅ Why it matters: Faster sites rank better, and users stay longer.
Elementor’s menu and anchor widgets make it easy to create smooth navigation but they can also help your SEO.
Here’s how:
✅ Why it matters: Internal linking improves crawlability and helps users (and Google) understand site structure.
Elementor Pro supports dynamic content and integrates well with schema plugins.
For even better SEO:
✅ Why it matters: Schema markup helps Google understand your content and can earn you rich snippets in search results.
Every page or post you build should target a specific keyword. Use your SEO plugin to check:
Use Elementor’s text editor and widgets to naturally include keywords don’t stuff them.
✅ Why it matters: Keyword targeting is still one of the strongest SEO signals.
Elementor gives you full control over your website’s design but when you pair it with SEO best practices, you get something even better: a high-performing site that ranks, loads fast, and converts visitors.
Start with good structure, optimize for speed and mobile, and lean on the right tools to fill in the SEO gaps. With that combo, you’ll have both form and function working in your favor
Elementor is an amazing tool for building WordPress websites without coding but even with its intuitive interface, it’s easy to fall into bad habits. Whether you’re new to Elementor or have been using it for a while, avoiding these common pitfalls will keep your site faster, cleaner, and easier to manage. Let’s break them down.

Many users add multiple nested sections to achieve layout goals. While this seems harmless, it can quickly lead to:
Fix it: Use columns inside sections instead of stacking multiple inner sections. Keep nesting to a minimum for better performance and easier edits.
Designing only for desktop is a rookie mistake and a costly one. Over half of all web traffic comes from mobile devices, and Google’s index is mobile-first.
Fix it: Use Elementor’s Responsive Mode (tablet and mobile views) to:
Test everything on actual devices before publishing.
Creative freedom is great until your site starts looking chaotic. Inconsistent fonts and colors not only hurt your branding but also confuse visitors.
Fix it: Set Global Fonts and Global Colors in Elementor’s Site Settings and stick to them. This ensures a clean, consistent look across every page.
Elementor has hundreds of third-party extensions. While some are helpful, overloading your site with plugins:
Fix it: Stick to reputable, well-supported add-ons and limit their use. Evaluate if a feature can be done with Elementor or Elementor Pro before installing something new.
Just because you’re designing visually doesn’t mean SEO takes a back seat. Many Elementor users forget to:
Fix it: Pair Elementor with an SEO plugin like Rank Math or Yoast SEO, and always structure your content with Google (and users) in mind.
Uploading large images without compression is a guaranteed way to slow your site down. It’s one of the most common speed-related issues.
Fix it:
If you’re rebuilding similar sections (like testimonials, contact blocks, or CTAs) on every page, you’re wasting time and making future updates harder.
Fix it: Use Saved Templates and Global Widgets. This way, you only have to update content in one place, and it reflects everywhere it’s used.
Elementor lets you experiment freely but things can go wrong. Accidental deletions, plugin conflicts, or botched updates can cost hours of work.
Fix it: Always back up your site before updating Elementor, switching themes, or installing add-ons. Use a plugin like UpdraftPlus or your host’s backup tools.
Changing colors, fonts, or margins manually in each widget can lead to an inconsistent mess.
Fix it: Use Elementor’s Global Controls to define styles once and apply them site-wide. This ensures brand consistency and easier future redesigns.
Elementor sites can get heavy, especially if built without performance in mind. Bloated pages hurt your SEO, UX, and conversion rates.
Fix it:
Elementor is powerful, but with power comes responsibility. Avoiding these common mistakes will help you build websites that are not only beautiful, but fast, scalable, and user-friendly.
By staying clean, consistent, and performance-focused, you’ll save yourself from frustrating rework and set your site up for long-term success.
Elementor has completely changed the game for web design making it possible for anyone to build beautiful, functional websites without writing a single line of code. Whether you’re creating a simple landing page or building out a full website, mastering Elementor means mastering a tool that can scale with your goals.
No matter where you are in your Elementor journey, staying focused on best practices will help you build faster, rank higher, and impress users with a professional look and feel.
Here are some trusted tools, guides, and communities to keep learning and building:
Elementor puts incredible power in your hands. But just like any tool, the results depend on how you use it. Take time to master the basics, keep things clean and user-focused, and you’ll be amazed at what you can build without touching a single line of code.
Need help getting started or want personalized tips? Drop your question in the comments or reach out we’re here to help.